When you’re hit with limited or no connectivity error, your business, studies or whatever you do on the net is brought to a screeching halt. The most commonly found connectivity errors can usually be fixed with simple steps. So there’s no need to panic.
Step 1: Check Your Login Information
The limited or no connectivity problem may arise due to incorrect log-in information . If you are using a Wi-Fi router or modem, incorrect WEP key may cause the error. In such cases, the router gets connected but is unable to transmit the data due to conflicts. Re-registration of WEP key resolves the problem.
Step 2: Restarting Your Internet Protocol
Check if the DHCP or dynamic allocation of IP addresses service is working . This service helps your computer configure and find web addresses. If this this service is stopped, it could prevent you from adequately access the net.
- Go to start menu navigation and click on the Run option.
- Type “services.msc” and hit enter. In the pop up window find out the status of the DHCP service. It is always a better idea to keep the settings on automatic start and if the service is stopped, restart it by clicking on the start button. This should solve the problem forever.
- In case still if you have limited or no connectivity, try to assign IP address manually. This should help
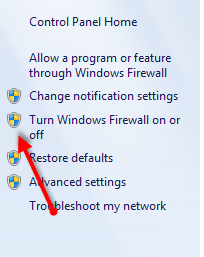
Step 3: Alter Your Firewall
In case the problem continues, check the configurations of the firewall. It is a powerful feature to keep unwanted intruders away, but may cause a conflict and induce the problem.If you still get the error message, it is time to check the hardware devices.
Step 4: Check Your Hardware
- Click Start
- Open Device Manager by right clicking Computer.
- Click on Properties.
- Search for the Ethernet adapters and right click to launch properties. If everything is fine and the menu of use this device is “enabled”, then close all popped up windows.
- Disconnect your modem, router and all cables after switching off your computer and modem. Unplug all cables and check for broken terminals or loose pins. Check for a high degree of dust in the modem sockets and clean if necessary. Plug in all the cables, turn on the modem and computer, and wait for five minutes. If the problem persists, try to repair the connection by going into the connection dialog and then click on support tab. Here click on the repair button. Your Windows will disconnect the adapter, reconnect the adapter, and renew its IP address.
- If the problem still repeats, check for the modem configurations. You can always reset the modem and re-install the modem settings as defined by your internet service provider. In the modem configuration dialog page, you have an option to check modem parameters. These parameters indicate how your modem is connected to the ISP and is transmitting the data, as it should. If it is working fine, restart the computer and get connected.
A common culprit is updates. Installing new software features can often erase old settings. So you may need to use system restore to reverse this problem. Finally you may need to call your ISP.