Uncategorized Archives - Delete Computer History

Disabling Auto Arrange in Windows 7

Posted by | Uncategorized | No Comments

Disable Auto Arrange in Windows 7.

  1. Some background follows. In Windows 7 (Windows Explorer) and 8 (File Explorer), when a file is created or moved or renamed within a folder, that file is immediately placed in its location within that folder based upon the sorting currently in effect for the folder. This process is illustrated in the three screens below.

The folder contains five files that are sorted in Name order. When the name of the first file is changed from ear.jpg to fear.jpg, then as soon as you press Enter to effect the rename, the renamed file will immediately move to the end of the list. Windows does not provide a means of disabling this automatic sorting facility, a feature commonly called Auto Arrange. In addition, you cannot drag these file icons into a new order. There is a way in which this Auto Arrange function can be partially disabled, and this process is described below beginning in step 3.

  1. Windows provides eight file views (see below). The files in the example above are in Medium Icons view. Auto arrange is in effect in all views. One consequence of this behavior is that you cannot reorder photos that are displayed in one of the first three Icons views simply by dragging and dropping them into a new position, as you could in Windows XP. If you were able to move photos into a different order, then you could pass them to the Flash Renamer program via a right click menu option and rename them after they have been reordered, locking in this order with a new file name followed by a sequential number. The installation of Flash Renamer and its right click option are described starting in step 10.


  1. This Auto Arrange feature can be partially disabled. A guru on the Windows Seven Forums site has created batch files (.bat) that perform two functions. The first disables Auto Arrange in Windows 7 Explorer and the other restores it. I have examined the files and simplified the first one. The feature has the following limitations, none hampering productivity:
  • It disables Auto Arrange only in the My Pictures folder or any of its subfolders (my only simplification).
  • It does so only when the folder is displayed as a User folder and not as a Library folder (see step 8 for an explanation).
  • It disables it only when files are displayed in any of the four Icons views or the Extended Tiles view. (In practice, the Small Icons or Extended Tiles views are almost never used.)
  • You can drag images around within the folder or into it from other folders, thus reordering images for slide shows or for any other purpose. You can rename the images in place and their order will not change, no matter what the new name is.

On rare occasions, when files outside the My Pictures folder need to be rearranged, those files may be moved temporarily into a subfolder within My Pictures, where the rearranging and renaming can be performed, and then moved back into their source folder.

Steps 4 to 8 provide detailed instructions on disabling Auto Arrange and step 9 describes how to restore Auto Arrange if this is ever desired.

Warning! These two batch files update the Registry and work only for Windows 7.

  1. Create a restore point. Go to start, right click on Computer, and click Properties. Click on the System protection link on the left (see below left). A System Properties window will appear with the System Protection tab selected. Close the System window (below left). Under Protection Settings, verify that Protection is On (below center) for your main drive (normally the C: drive)—if it is not, then do not disable Auto Arrange—something is wrong with your computer’s setup. Otherwise, click on the Create… button, enter a description for the restore point, and click Create (below right).

The window shown below left will appear. Within a minute the window shown below right will appear, indicating success. Click Close. Click OK to close the System Properties window.

  1. Create the DisableAutoArrange.bat file. The boxed code below is a script that contains the following commands that will be executed on the screen in a Command window—their case is not important (ECHO is the same as Echo or echo):

@echo off Prevents commands that are being executed from being displayed on the screen.

echo [text] Text that will be displayed on the screen, typically status information for the benefit of the user.

:: [text] A comment line in the code, facilitating code comprehension and maintenance.

reg delete [params] Command to delete the specified key in the registry.

reg add [params] Command to add the specified key in the registry.

taskkill [params] Command to terminate a task, in this case, Windows Explorer.

start [params] Command to start a program.

cls Command to clear any statements in the Command window and display only a prompt.

timeout [params] Command to pause the program for a number of seconds to await completion of a prior command.

explorer.exe [params] Command to open a Windows Explorer window and display the specified folder.

@echo off

:: Created by: Shawn Brink

:: http://www.sevenforums.com

:: Tutorial: http://www.sevenforums.com/tutorials/92758-windows-explorer-auto-arrange-disable.html

:: To reset all folders to default folder views

Reg Delete “HKCU\Software\Microsoft\Windows\Shell\BagMRU” /F

Reg Delete “HKCU\Software\Microsoft\Windows\Shell\Bags” /F

Reg Delete “HKCU\Software\Microsoft\Windows\ShellNoRoam\Bags” /F

Reg Delete “HKCU\Software\Microsoft\Windows\ShellNoRoam\BagMRU” /F

Reg Delete “HKCU\Software\Classes\Local Settings\Software\Microsoft\Windows\Shell\BagMRU” /F

Reg Delete “HKCU\Software\Classes\Local Settings\Software\Microsoft\Windows\Shell\Bags” /F

Reg Delete “HKCU\Software\Classes\Wow6432Node\Local Settings\Software\Microsoft\Windows\Shell\Bags” /F

Reg Delete “HKCU\Software\Classes\Wow6432Node\Local Settings\Software\Microsoft\Windows\Shell\BagMRU” /F

:: To kill and restart explorer

taskkill /f /im explorer.exe

start explorer.exe

CLS

echo.

echo.

echo Please wait for explorer to restart. No need to do anything.

echo.

TIMEOUT 10

:: To open the Computer window

explorer.exe shell:MyComputerFolder

:: Disable Auto Arrange for Pictures folder template

REG ADD “HKCU\Software\Classes\Local Settings\Software\Microsoft\Windows\Shell\Bags\AllFolders\Shell\{B3690E58-E961-423B-B687-386EBFD83239}” /V FFLAGS /T REG_dWORD /D 1124073476 /F

REG ADD “HKCU\Software\Classes\Local Settings\Software\Microsoft\Windows\Shell\Bags\AllFolders\Shell\{B3690E58-E961-423B-B687-386EBFD83239}” /V LogicalViewMode /T REG_dWORD /D 1 /F

REG ADD “HKCU\Software\Classes\Local Settings\Software\Microsoft\Windows\Shell\Bags\AllFolders\Shell\{B3690E58-E961-423B-B687-386EBFD83239}” /V Mode /T REG_DWORD /D 4 /F

Select the text in the box above, open a Notepad window (go to start Notepad or start All Programs Accessories Notepad), and copy the text into that Notepad window. Verify that the first line is the @echo off line and the last line is the REG ADD line ending in /V Mode /T REG_DWORD /D 4 /F.

In Notepad, go to File Save As, select Desktop in the left panel, set File name to DisableAutoArrange.bat, and set Save as type to All Files (*.*). Click Save. See below.

  1. Be aware that the next step changes the Registry.

Microsoft states:

What is the registry?

The registry is a database in Windows that contains important information about system hardware, installed programs and settings, and profiles of each of the user accounts on your computer. Windows continually refers to the information in the registry.

You should not need to make manual changes to the registry because programs and applications typically make all the necessary changes automatically. An incorrect change to your computer’s registry could render your computer inoperable. However, if a corrupt file appears in the registry, you might be required to make changes.

We strongly recommend that you back up the registry before making any changes and that you only change values in the registry that you understand or have been instructed to change by a source you trust.

  1. Run the DisableAutoArrange.bat file you just created. Close all windows and then double click on the DisableAutoArrange.bat file on the Desktop. A Command window (below left) will appear, displaying comments and selected commands as they are executed. The entire process takes only a bit over ten seconds, given that one of the commands is TIMEOUT 10. At the end, the Command window closes and a Windows Explorer window (same result as start Computer) will open (below right). Delete the DisableAutoArrange.bat file on the Desktop. Close the Explorer window, which was opened only to illustrate the completion of the execution of the batch file.

  1. Understand the feature that you have installed.

There are two important aspects of the feature. You need to know in which views and folders it applies, and the effects of two settings you can change.

  • Views and Folders. Auto arrange has been disabled for only the five views identified below (left). In these views, you can arrange files and folders in any random order and position. When one of these views has been selected for a My Pictures folder, two extra settings—Auto arrange and Align to grid—will appear on the View menu item. (To make View temporarily visible, press the Alt key to reveal the Menu bar; to make it permanently visible, go to Organize Layout and check Menu bar.)

This Auto arrange setting does not mean that if checked, it re-enables the feature you have just disabled. Instead, it means “after I move an item to a new position, keep all items together without any white space between them.”

These two settings are grayed out for the other three views; see Warning immediately below if the two items do not appear at all. The default setting for folders in the five views is shown below right—Align to grid is checked and Auto arrange is not.

Warning: These two options will not appear if the My Pictures folder is being displayed as a Library folder. If this happens, locate the same folder in the left Explorer panel under your user name:

GOOD

BAD

  • Two changeable settings. You can manually check or uncheck Align to grid and Auto arrange. The settings apply to the currently selected folder and do not propagate to subfolders. The table below describes desirability and the effects of these four possible settings. They are illustrated using a folder containing the five items shown in the table above in Medium Icons view. A “grid” is an imaginary table of cells with the same height and width as each of the icons, so that when you drag an icon to a new location, it will snap to the nearest cell in the grid if Align to grid is selected.

Settings

(My Assessment) Effect when ear is moved beyond eggs

Illustration

Auto arrange

Align to grid

(Useless) Blank space may appear between items; items are not forced into a grid.

Auto arrange

Align to grid

(Possibly useful, but ultimately I would want to select Auto arrange) Blank space may appear between items; items remain in a grid. If first item is moved, then then the first block of items to its right shift left together to refill the first item’s position.

  • Auto arrange

? Align to grid

(Best setting; for clarity, I would check both options) No blank space ever appears; items remain in a grid. Warning: If you set Auto Arrange after you have reordered file names, it will cause they to be resorted.

Because the best setting is not the default setting, when you do need to rearrange items in a folder, you should go to View and check both Auto arrange and Align to grid before you starting rearranging.

To rename a group of rearranged items, you must first install Flash Renamer (see step 10) along with its right click function (see step 14) to enable the sending of a selected set of files to the program for renaming. The second example in step 15 illustrates the renaming of the five files described above after they have been placed in the order below:


  1. (optional) Restore Auto Arrange. Do this only if you are uncomfortable with some aspect of disabling Auto Arrange. (I suspect you will never have to perform this step.) To do so, you will run the following batch file, whose 22 lines are exactly the same as the first 22 lines of the first batch file. Detailed instructions are below.

@echo off

:: Created by: Shawn Brink

:: http://www.sevenforums.com

:: Tutorial: http://www.sevenforums.com/tutorials/92758-windows-explorer-auto-arrange-disable.html

:: To reset all folders to default folder views

Reg Delete “HKCU\Software\Microsoft\Windows\Shell\BagMRU” /F

Reg Delete “HKCU\Software\Microsoft\Windows\Shell\Bags” /F

Reg Delete “HKCU\Software\Microsoft\Windows\ShellNoRoam\Bags” /F

Reg Delete “HKCU\Software\Microsoft\Windows\ShellNoRoam\BagMRU” /F

Reg Delete “HKCU\Software\Classes\Local Settings\Software\Microsoft\Windows\Shell\BagMRU” /F

Reg Delete “HKCU\Software\Classes\Local Settings\Software\Microsoft\Windows\Shell\Bags” /F

Reg Delete “HKCU\Software\Classes\Wow6432Node\Local Settings\Software\Microsoft\Windows\Shell\Bags” /F

Reg Delete “HKCU\Software\Classes\Wow6432Node\Local Settings\Software\Microsoft\Windows\Shell\BagMRU” /F

:: To kill and restart explorer

taskkill /f /im explorer.exe

start explorer.exe

Select the text in the box above, open a Notepad window (go to start Notepad or start All Programs Accessories Notepad), and copy the text into that Notepad window. Verify that the first line is the @echo off line and the last line is the start explorer.exe line.

In Notepad, go to File Save As, select Desktop in the left panel, set File name to EnableAutoArrange.bat, and set Save as type to All Files (*.*). Click Save. See below.

Run the EnableAutoArrange.bat file you just created. Close all windows and then double click on the EnableAutoArrange.bat file on the Desktop. A Command window will appear very briefly and then disappear. Then a Windows Explorer window (same result as start Computer) will open. Delete the DisableAutoArrange.bat file on the Desktop. Close the Explorer window, which was opened only to illustrate the completion of the execution of the batch file.

Part VIII: Install Flash Renamer. [This section is optional but the actions taken above depend on its installation.]

Note: This part includes the installation of Flash Renamer along with a right click function enabling a file selection to be renamed in other than file name order, provided Auto Arrange has been implemented (see Part VII).


  1. Install Flash Renamer (http://www.rlvision.com/downloads.asp): This is a program that facilitates file renaming. It is especially effective at renaming image files from a camera. Although it costs $19.95, I have added it as a courtesy to some installations because I feel it is essential software. It has a wide range of powerful capabilities. I describe only one of them below, but it’s the one of greatest value to users. The version described below is Flash Renamer 6.72.

From the link, click Download next to Flash Renamer and then Run. A wizard will appear; accept the defaults. If later a new version becomes available, it should be downloaded and installed; it will automatically replace your older version and if the older version had been registered, that registration will be carried forward to the new version.

The first time you run the program, the following screen will appear. Click Close.

  1. With the unregistered version, the number of free file renames you may perform is limited. To purchase Flash Renamer, start the program, and in the UNREGISTERED COPY window that appears, click Register Now! and follow the prompts. As soon as you purchase the product, a product registration key such as ABCDEFGHI will be displayed on a web page. Restart Flash Renamer, and click on Enter Reg Code. Enter that value as the registration code. See below.

D:\Larry\Pictures\00 Temp\regform.jpg

  1. Pin the program to the start menu: go to start All Programs Flash Renamer Flash Renamer, right click, and select Pin to Start Menu. Click start and drag it into its alphabetical position.
  2. You can run the program in two ways. The normal way is to go to start Flash Renamer, and select the Replace tab in the left panel and the Browser tab in the right panel. A second way is to invoke it via a right click option that is installed in step 14 and for which two examples are given in step 15.

In the right panel’s text box (see below center), you enter the name of a folder, and the names of the files in that folder—typically .jpg files—are displayed. In the left panel (below left), with the Replace radio button selected, you specify the new name you wish to give the files—in this case set Find… to * [for all files] and set … and replace with: to Wedding <enum>.

When you click Rename, the file names change to Wedding 01.JPG, Wedding 02.JPG, etc. In the Ready! window that appears (below right), check Auto close and then Close, so you don’t see this window ever again. The files have been renamed as requested. If you make a mistake, press the Undo button to the right of Rename.

After Rename has been clicked, the right panel displays the new names in the Name column (see below left). If there are fewer than ten files, the <enum> generates a 1-digit number; if there are fewer than 100 files, it creates a 2-digit number, etc. These are the defaults, and my experience is that these defaults are ideal. (The file extension is not renamed; only the portion preceding it is. Thus if the 5th file were x 005.MOV, it would become Wedding 05.MOV.)

If you wish to change these defaults, then with General and the Replace tab selected, click on Counter to the right of Setup tags (below center) and the Counter Setup window (below right) will appear. Auto is checked, meaning “pad with only as many zeros as needed to keep all counters the same length”. This window specifies the meaning of the tag <counter>, used to refer to a variable component of the new file name. (I use <enum> in most places in these examples instead of <counter> because it is shorter and, although undocumented, appears to be equivalent.) Configure the Counter Setup window as desired and click Ok.

To make the file extensions lower case as well, click on the Casing tab, set Casing of Filename to No Change, set Casing of File Extension to Lower case (see below left), and click Rename. See results below right.

When you rename files in this way, the file names are always presented in the Browser tab’s window in ascending alphabetical order.

You may also set up a right click option, enabling you to select a group of file names arranged in any order and invoke Flash Renamer to rename the files without changing their order. This is discussed in the next two steps.


  1. To rename files in a different order you need to make two essential tweaks to Flash Renamer and then install a special program that enables Windows Explorer to honor the first tweak.

Implement two Flash Renamer tweaks

Go to start, right click on Flash Renamer, and select Run as administrator. Answer Yes to the UAC prompt. Click Settings at the bottom of the left Flash Renamer panel and a Flash Renamer Settings window will appear. On the left, select Shell Integration, select Show Flash Renamer menu (screen 1 below), and click OK when the warning message appears (screen 2). On the left, select Advanced, scroll down in the list of Advanced Tweaks to Auto Sort Command Line Files. If the Value is not 0, change it to 0, click Set (screen 3), and then click Ok. Close Flash Renamer to ensure the settings you made take effect.

Install the “WOW64 (32-bit) menu” item to the File Explorer right click list

This action enables you to select a group of file names that have been sorted in any order—even a list that is subset of files within a folder—and pass that list to Flash Renamer for renaming, and Flash Renamer will not alter the sort order as it renames the files. For some users, this may become the preferred way to invoke Flash Renamer.

Background: To invoke Flash Renamer from right clicking on file names within File Explorer, you must be running the 32-bit version of File Explorer. Since all computers sold today are 64-bit machines, the default version of File Explorer on these machines is the 64-bit version. (The “C:\windows\syswow64\explorer.exe /separate” command will start the 32-bit version of File Explorer within a 64-bit system, but this is an awkward step to take.) Thus what you are doing here is adding to the right click list an invocation of a 32-bit menu, which includes Flash Renamer and nine invocation options, one of which may be used to display the selected file names with their order unchanged, ready for renaming. This add-on is supplied free from the website www.gasanov.net, which includes several other useful Windows tools.

Go to http://www.gasanov.net/WOW64Menu.asp and click on WOW64MenuSetup.zip at the bottom of the page. When the window below left appears, click on Open. Click on Open at the bottom of the Internet Explorer window. When a Windows Explorer window opens, click on WOW64Menu.msi (see below right). Click Run and when the WOW64Menu window opens, click on Next, Next, and Next. Installation will begin. Respond Yes to the UAC prompt and then click Close. The installation is complete.


  1. Two examples follow to illustrate invoking Flash Renamer the second way, via a right click menu selection.

In this first example, we use the 14 Wedding photos from above but sort them by Size in File Explorer. The names are no longer in ascending order (see below). We intend to rename them, maintaining this order, to “Special Event <enum>”.

Select them all and right click on the first file in the list. A menu will appear (below left). Select the WOW64 (32-bit) Menu item and a second menu is revealed (below center) that includes Flash Renamer. Click on Flash Renamer and a third menu appears (below right). Although nine options are available, only one is appropriate for this use. Click on Start & load selected files.

Flash Renamer will start with the same panels you are accustomed to seeing except that on the right the Free Select tab will appear. In the left panel, on the Browser tab, specify the source as all files (“*”) and the new name as “Special Event <enum>” (below left). The Preview column will display the new names in the right panel (below center). Click Rename. The names will be changed (below right).

The files have been renamed in sequence while remaining sorted in Size order (see below).

Warning: When selecting more than one file for renaming, you must right click on the first file name in the list. If you click on another file name, that file name will appear within Flash Renamer as the first file in its list, and the files will be interpreted as a circular list, so that the one prior to the first file selected will appear last. For example, if I had right clicked on Wedding 14.jpg instead of Wedding 01.jpg, Flash Renamer would have presented me with the following Preview.

In this second example, we rename the five files presented above in steps 1 and 8. They are in a Medium Icons view, in a user’s My Pictures folder, with both the Auto arrange and Align to grid options checked. The ear.jpg file has been dragged to the end of the list so the list is not in order. The names will be changed from those on the left to those on the right.

To rename them, select the five items, right click on the first item of the selection, and select WOW64 (32-bit) Menu Flash Renamer Start & load selected files. In the Flash Renamer window that opens, set Find… to * and set …and replace with: to E Item <enum> and click Rename. The left panel and the before and after screens appear below, showing the renaming of the five items above with ear.jpg at the end.

Internet Privacy and Security Software

Posted by | Uncategorized | No Comments
Internet Privacy and Security Software

There are a lot of good internet privacy and security software applications available. You can use a variety of tools to protect your computer and lead a private online life.

1. Disk Cleanup

Disk Cleanup is a speed up computer software that can be accessed via your Windows This application will erase all junk files and unnecessary data that has been saved. This includes deleted information in the Recycle bins and error reports. Crash data dumps are also stored in this area.

Watch how to Speed Up Computer with Disk Cleanup

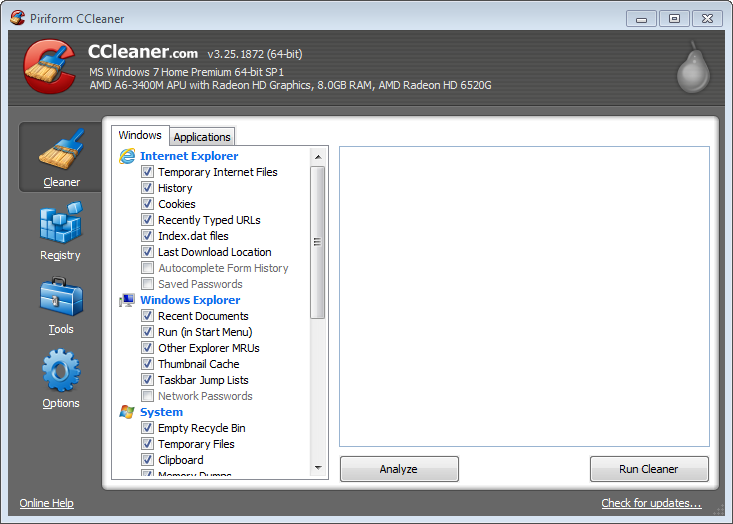
2. CCleaner

This is a free application that pretty much does the same thing as Disk Cleanup. However, it offers up a few more perks such as registry cleaner, uninstaller and offers a secure delete function. CCleaner is one of the most downloaded speed up computer on the internet. It’s becoming an essential part of many people’s computer maintenance. Also , it’s a time saver for controlling your start up configuration and uninstalling under one hood. You can download this program from the CCleaner Website.

3. Revo Unistaller

Uninstalling program increases disk space. Yes you can use Windows Uninstaller the only advantage of this program is that it will remove the registry entries that are left when you uninstall a program. To visit this speed up computer software website, click here

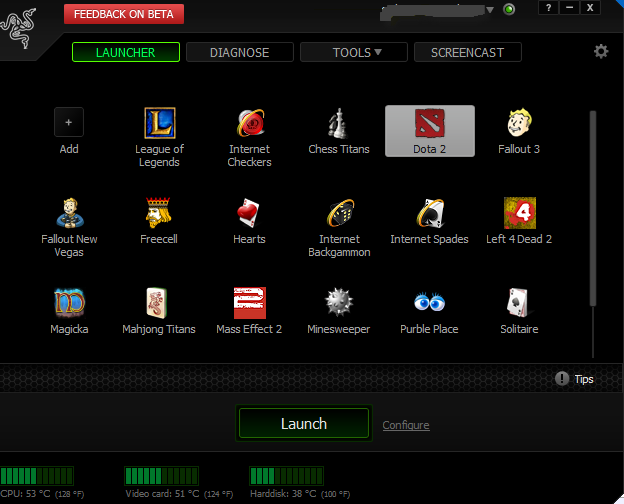
4. Razer Game Booster

This is a great program for gamers looking to increase frame rate. This program cuts down on your computer RAM usage and CPU usage to give you a more of these resources to use for games. Modern games can demand extreme amounts of CPU resources so you will often see spikes of 100% CPU usage. Game Booster helps to knock down the number a bit. Its in BETA so the kinks are still being worked out. Nevertheless, gamers should check this out. The awesome part of this program is that it allows you ot defrag your game files. Download the program here

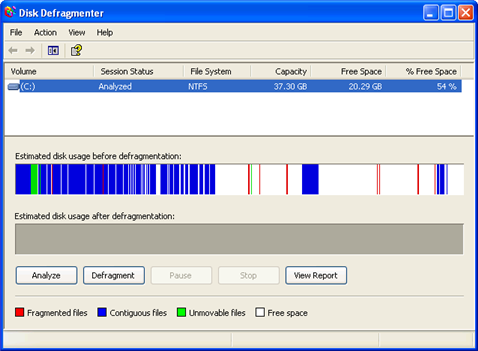
5. Disk Defragmenter.

This is extremely important tool that allow you to re-organize your filing system. Over time you filing system gets fragmented. The more fragmented the system is the longer it will take your computer to load software and find files. You can get a step by step tutorial on this website.

Extra Tip: Registry Cleaners

These programs remove registry entries and defrag your computer regristry which is your computer’s largest filing system. This program also fixes errors and removes old program tags that get left when you uninstall programs. It’s debatable on the overall effect of the speed up computer software. Check our Registry Cleaner Reviews

Slow Streaming Video

Posted by | Uncategorized | No Comments
Fix Slow Streaming Video Problems

Slow streaming video can put a damper on your internet video viewing experience, especially if you’re using a service like youtube.com or Vimeo.com. It’s quite possible you’re streaming videos using a DSL or cable modem connection. Most videos should load and play simultaneously using streaming video technology. However, your PC may be inhibiting you from taking full advantage of streaming videos. This page will give you useful tips to troubleshoot your slow streaming video problems.

Note: Simply by detecting and removing spyware and malware you can free up tons of resources for video streaming and other high performance computer tasks.

Let’s begin with the basics to get you started.

How Does Streaming Video Work?

Streaming video or streaming media allows the Web user to avoid waiting to download a large file before seeing the video or hearing the sound. Instead, the media is sent in a continuous stream and is played as it arrives. The compression of the video allows it to be played simultaneously. Depending on your choice of media player and the file’s compression rate, the time it takes for the video to stream may vary.

The file is hosted on a server which can “multi-cast” the same file to multiple users at the same time. When you click on the video it is partially loaded before you can access it. This is known as “buffering”. Now lets take a look on how to cut down on buffering time, stop slow streaming video and eliminate choppy PC video playback.

How to make Streaming Video and Media load faster.

There are two aspects that are responsible for the slow streaming video. These are the computer’s ability to “play” the file and your computer’s ability to “receive” the file.

One immediate way to make your PC faster is to use a good registry cleaner also.

Step #1–Create More Resources to Receive the file

Receiving the video requires that you have the proper amount of space needed to load the video temporarily. The video will be loaded in to your Web Cache. If this area is full, the video will be slow streaming. To clear the web cache

  • Quit Internet Explorer, Firefox, or any other web browser
  • Click Start, click Control Panel, and then double-click Internet Options.
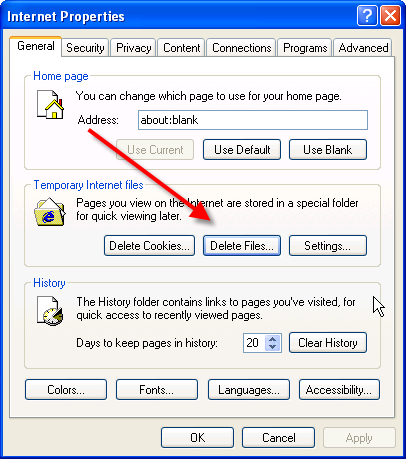
  • On the General tab, click Delete Files under Temporary Internet Files.
  • In the Delete Files dialog box, click to select the Delete all offline content check box , and then click OK.
  • Click OK.

+ You can also delete your browser’s history by simply pressing CTRL-SHIFT-DELETE

+ Close Applications

Stuttering, choppiness and freezing can be linked to lack of RAM. Also some programs maybe using your bandwidth. When you stream your videos, cut down on the number of background programs running. A lot of slow streaming video problems can be attributed to excess programs.

  • Close all unnecessary windows
  • Shutdown all other programs
  • Disable Browser Add-ons and Toolbars
  • Limit yourself to one video at a time

Open the task manager by pressing CTRL-ALT-DELETE. Click the application tab. End all programs, you are not using. You can also speed up your computer and streaming video by cutting down on your startup programs. Here is how:

  • Click Start
  • Click Program Files
  • Choose Accessories
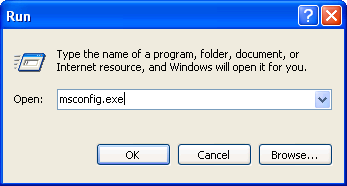
  • Click RUN
  • Type MSCONFIG, then Enter
  • In the System Configuration window, Click Startup
  • Uncheck all the programs that are unnecessary

Step #2–Stop Choppy Playback

Choppy playback can be directly related to your computer’s performance, specifically lack of free resources. You should streamline and tweak your computer to stop slow streaming video problems. One way to do this clean an organize your computer. So, if you haven’t cleaned your registry in a while. This is necessary step to stop game lag, slowdown and overall destruction of your system’s stability. Your registry holds all the information regarding updates, installs, un-installs etc. Each one of those events has a key. That key needs your PC’s resources and free space. So, if you clean your registry, you make more resources available for speed. Do a registry scan if you got more than 20 errors you should clean it.

Slow Streaming Video may be directly related to your corrupted registry, Click here for a FREE Scan!

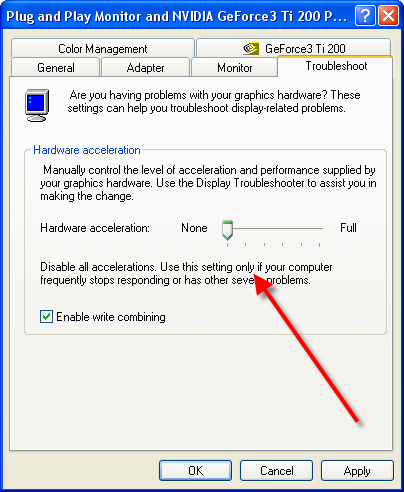
Another way to stop choppy playback and slow video streaming is to Disable the use of hardware acceleration. Hardware acceleration can cause choppy PC playback, application crashes and slow streaming video problems. This occurs because the option forces all video players to conform to one setting. By disabling this option, the individual player can set based on the requirements of the file.

Disable Hardware Acceleration by using these steps:

    Click on Start

  • Click Control Panel and Click Display
  • Select the Settings tab and click on the Advanced.
  • Click on the Troubleshoot tab.
  • Disable the hardware acceleration completely by dragging the slider to the extreme left.

In Vista

  • Click Start
  • Click Control Panel, choose Appearance and Personalization, click Personalization, click Display Settings, and then click Advanced Settings.
  • Under the Troubleshoot tab, and then click Change Settings.

In Windows 7

  • Click Start
  • Choose Control Panel
  • Click Appearance and Personalization
  • Choose Display
  • Click Change Display Settings
  • Choose Advanced Settings and Click Troubleshoot tab
  • Click Change Settings
  • Move the Hardware Acceleration slider to none

+ Eliminate Long Load Times and Excessive Buffering

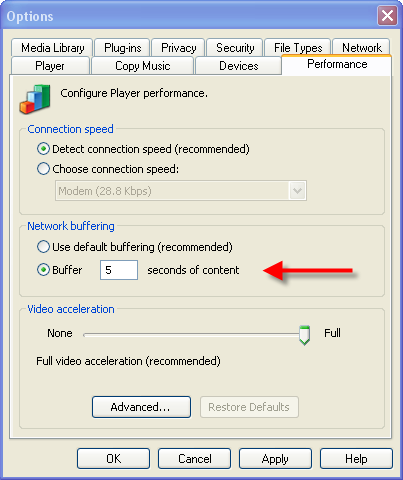
Most players will allow you to alter their buffer settings.Below is an how to change buffer setting in Media Player.

You can change the default buffer settings in Windows Media Player, use instructions below:

  • Start Windows Media Player
  • Click the View
  • Click Options
  • On the Advanced tab, click Streaming Media(Windows Media)
  • Click Change to alter the buffer settings.

+ Increase Virtual Memory

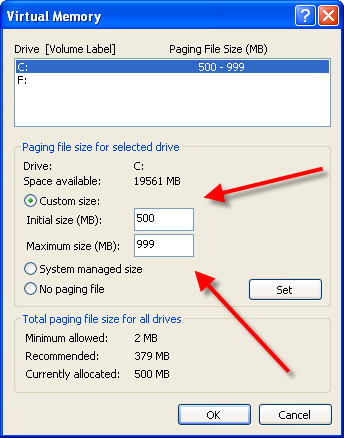
The final step but this step is often not needed to speed up slow streaming video. You can change your virtual memory by altering amount of free resources for your computer to use for it, in a sense making the spare bucket bigger. Virtual memory uses free space as a resource. So you can change the the amount free space reserved for the Virtual memory.

When you get to the Virtual Memory menu select the Custom Size check box. Then choose the initial size and the max size. Depending on how much free space you have you can choose what that amount of free space you want. If you are still confused the link has a visual step by step instructions.

  • Click Start, and then click Control Panel.
  • Click Performance and Maintenance, and then click System.
  • On the Advanced tab, under Performance, click Settings.
  • Under Virtual memory, click Change.
  • Under Drive [Volume Label], click the drive that contains the paging file that you want to change. In most computers its C:
  • Under Paging file Size for selected drive, click to Custom size check box. You can enter the amount of memory you would like to reserve for Virtual memory by entering the initial and maximum size.
  • Click Set

Hot tip: Keep the initial and maximum size the same to cut down on your CPU access. This will stop your CPU from constantly change your Virtual memory paging size. Also set the size 1.5 times higher than your physical memory.

Step #3–Tweak Your Internet Connection

Simply tweaking your connection to get the best speed possible will do wonders from streaming videos online. Remeber that bandwidth is one of the key factors in fast buffering and instantaneous streaming. There are several ways in which you can speed up your internet connection.To learn more about how to make your internet connection faster, click here!

Ways to Speed Up your Internet Connection

  • Stop Background Updating
  • Port Blocking
  • Control Your Antivirus
  • Improve Cabling
  • Using DNS Servers

Step #4–Lowering Video Quality

Streaming HD video or high quality videos takes a tremendous amount of your internet bandwidth. If you do not have a super fast connection, you will have to buffer videos to play them at the peak quality. A good way to speed up your streaming is to simply lowering the video quality. This can be done in all the major streaming sites. Just look for the option button in the lower right corner of the player. To learn more about lowering the quality of videos for better streaming on Youtube, click here


RELATED TUTORIALS:

Best Spyware Removal Programs

Posted by | Uncategorized | No Comments
Choose the Best Spyware Removal Programs

The best spyware removal programs remove and block all spyware, trojans and keyloggers. It’s that simple! These programs don’t stop all malware such as viruses. However, spyware is the biggest internet security threat. Spyware is often used as the key to open the door way of internet identity theft. Let’s start from the beginning in order to give you the knowledge to help you need to choose the best spyware removal programs.

Note: if you want to remove spyware right away, check out this tool. Otherwise, read on.

What is spyware?

There is no simple definition for spyware. Spyware is more of a catch all term that includes the most dangerous malware, pop up ads, key loggers and trojans.

How does the best spyware removal programs work?

Spyware removal programs use signature based protection. This is very similar to anti-virus programs. Spyware removal programs have a vast database of programs signatures that are used to match the signatures of malicious spyware. When a match is made, the anti-spyware program removes and blocks the program. The best spyware removal programs regularly scans your system contents to detect new spyware.

The negative side of signature based removal programs is that the signature has to be discovered and added to the data base. The time delay can allow some advanced spyware to operate unaffected in your PC until the database is up dated. There are some programs that do not signature based protection. However, this technology is faulty because it relies on program behavior rather then identification.

What are the leading anti-spware products?

It changes often. However, there are some that are constantly at the top of the heap: Norton, Adaware, etc. These programs have constantly come out on top because ability to clear almost all spyware from the most infested computers. In addition they come with a free Anti-virus program. It offers multi-level protection including blocking access to known spyware sites.

Warning– Some Free Antispyware has been proven to attract spyware. This software is often easy to crack and can not keep up with current technology becuase of spyware producers due to lack of financing. Its a real gamble to use freeware in this category. However, AVG Free and Microsoft Security Essentials.

The Best Spyware Removal Programs

Ad-Aware Pro Internet Security

  • Spyware Removal………8
  • Spyware Blocking………8.5
  • Keylogger Removal…….8
  • Keylogger Blocking……8.5
  • Magazine Average…….8
  • Ease of use………….8..5
  • Anti-virus bundled……yes
  • Price $29
  • Overall……………..8.5

Delete Computer History

Norton Internet Security Suite

  • Spyware Removal………9
  • Spyware Blocking………9
  • Keylogger Removal…….9
  • Keylogger Blocking……7.9
  • Magazine Average……..9
  • Ease of use………….8
  • Anti-virus bundled……yes
  • Price $69
  • Overall……………..8.8

Delete Computer History

Microsoft Security Essentials

  • Spyware Removal………8.8
  • Spyware Blocking………8
  • Keylogger Removal……..8
  • Keylogger Blocking……8.8
  • Magazine Average……..8.9
  • Ease of use………….8.0
  • Anti-virus bundled……yes
  • Price $49
  • Overall……………..8.6

Delete Computer History

What is the best registry cleaner?

Posted by | Uncategorized | No Comments
Did you pay over $50 for a registry cleaner? Sucker! What is the best?

Well… a good registry cleaner should do a number of things. So before we find out what is the best registry cleaner, lets take a moment to see what our scoring criteria is: Most importantly the software should clean and organize your Window’s registry of all unwanted registry tags and index.dat files. This allows your CPU to access freed resources that fragmented registry would use for useless processing. This program should also have the ability to perform a defrag your hard drive and eliminate spyware.

The question is why spend a hundred dollars on software that does the same thing that a $50 piece of software does? Well if you like pretty graphics and go for big name brands, you are getting what you are paying for. But if you are into getting a cheap, well designed product that allows you to clean your registry with one click read on.

So what is the best registry cleaner? A better question is what is the best registry cleaner for the best price?

Here are some registry cleaners that offer superior service that are around $40 and will get you on your way with little or no knowledge needed of the program.

TOP 5 REGISTRY CLEANERS

regcurepro-box.jpgRegCure PRO is the The Most Popular Registry Cleaner on the market now.

The cleaner comes with a vast library of error fixers, dll files, harmful process killer and other additions. On top of being an excellent registry cleaner. RegCure PRO is an insanely popular registry cleaner with 60 Million Downloads! It allows you to defrag and permanently delete files with just a click. You are essentially getting to 4 great programs for free. Its super easy to use for newbies and sophisticated enough for veterans who want to tweak it out. The simultaneous defrag and registry cleaner will seriously save you a lot of time in maintenance. The costumer service is also very good. The install is super small and using almost no resources. Regcure Pro offers free applications to speed up your PC Visit the Website for RegCure PRO if you have dll file concerns also. You can go wrong with this best buy.

  • Performance 98.0%
  • Ease of Use 97.0%
  • Features 97%
  • Magazine Average 98.5%

Overall score ……….98%

96.33% Portion of People who Buy This Product.

8356-2666SpeedyPC PRO excelled as a quality program, Speedy PC Pro 2012 is a great product that has a host of applications that help to boost PC, debug and clean up your PC. It has an excellent registry cleaner that fixes and repairs registry errors.

It’s a excellent tool box that helps you monitor your PC status and help you avoid registry, driver and application problem. Its scans for drivers, Active X and error programs. It gives you an indication on if your PC need to be decluttered and defrag performed. It also has a malware detector that will help you keep your PC spyware. Its a great application to keep your PC running smoothly. For a list of Errors and features this products fixes, Visit the Website for SpeedyPC Pro

  • Performance 94.02%
  • Ease of Use 95.3%
  • Features 94%
  • Magazine Average 96.6%

Overall score ……….94.7%

pc_health_advisor_box_leftPC Health Advisor has been rapidly growing in popularity. It has had a checkered past. However, the company seems have succeed in producing a powerful registry cleaner that so easy to use that a child could use. It finds the most amount of registry errors than any other cleaner.
People are moving away from just registry cleaners and looking for a full service bargain software that will speed up there PC with just a click. This program comes packaged with an anti-malware application, cleanup utilities and a killer registry cleaner. So, overall this is the best bang for your buck if you looking for a full service product. Visit the Website for PC Health Advisor

It also offers a fair amount of features. This registry cleaning package allows it to take the crown.

  • Performance 94%
  • Ease of Use 93.0%
  • Features 92.7%
  • Magazine Average 93.0%

Overall score ……….93.5%

RegistryBooster_Boxshot11Registry Booster This superb registry cleaner is a magazine darling and increasingly collecting consumer awards.There are almost no negatives for this increasingly popular product. It tops our list for best registry cleaner of the year. There seems to be a consensus about the quality of this product. It has racked up Editors Choice Awards at Cnet, Zdnet and a ton of top publications. Visit the Website for Registry Booster

The interface is sleek and extremely user friendly. It is a product that allows you to visually understand how it is improving your registry and speeding up your PC. Errors, corrupted files, dlls are fixed within in seconds. There is a damage meter that provides you with an indicator on when you to tune up your PC. It removes obsolete shortcuts, duplicate files and fully deletes troublesome software. An Excellent product.

It’s the Winner of Over 100 5 star awards!

  • Performance 94.7%
  • Ease of Use 92.9%
  • Features 90%
  • Magazine Average 92.2%

Overall score ……….92.7%

Registry Mechanic 10 was on the top of many best list this year and has 13 million downloads. Why do we consider this one of the best registry cleaner? One reason is that it is a very small download that does not require resources to run it. It quietly runs in the background with the need of your PC’s much beloved speed. PC Tools, its maker has an excellent reputation and plethora of other good software.

142-boxHowever, I find the interface a bit clunky. It took me more than an hour to understand the program before I could get it up and running. However, once in motion, it will not only restore and clean up your Windows registry, but it will also fix DLL error messages and repair General Protection Fault errors.
  • Performance 89.2%
  • Ease of Use 92.13%
  • Features 94%
  • Magazine Average 86.6%

Overall score ……….90%

what is the best registry cleaner ?

Scam Sites

Posted by | Uncategorized | No Comments

Is this website safe?

TROJANS, VIRUSES, POPUPS, SCAMS–The internet is a dangerous place. More and more scam sites are popping. Most users want to know if this site is safe or will get ripoff by an online scam. Our users always tell us stories about sites that have tricked them or infected their computers with spyware.

The best defense is common sense and some tools to protect yourself online.

Here are some that we recommend:

And for Mac users:

Scam websites are reported to be 1 out of every ten websites on the internet. So, its difficult to follow the old tips. Popular websites that have free streaming video, fake anti-virus sites, and social networks have all become new areas target by spammers and identity thieves. Lets face it dangerous sites are everywhere. Be sure to check our site often. We try to give you the latest tips and tricks to be Speed up your PC, make your hard drive more efficient, stay safe, and much more!

How to Increase Internet Speed

Posted by | Uncategorized | No Comments
How to Increase Internet Speed

Are you wondering how to increase internet speed and performance? We all are. There are only a few ways to increase internet speed. The 3 main options for you are to improve your hardware, modify internet configuration or get a faster connection. There no other ways to increase internet speed. So there is no magic trick like wrapping a hanger with tin foil and placing it next to your wireless router. However, there are ways to increase internet speed by tweaking your options.

2 Ways to Increase Your Internet Speed

Improve your Hardware
Hardware matters but a lot less than you think. However, upgrading your hardware will provide you with better internet usage.
Tweak Your Software
There a low of ways to maximize your internet connection by simply using the right connection settings. Everyone should be doing this in order to get their money’s worth.

Checklist for How to Increase Internet Speed

16 Things you should do to increase internet speed

6 Hardware Upgrades

Improving your hardware is a simple choice but it does not always lead to increase in internet speed. Improving your router and modem are a good idea. However, most ISP provide a good standard modem and the router are pretty standard nowadays. Advances here and there will you provide you with a small increase.

  • Get Better Cables believe it or not this really make a huge difference.
  • Get a Wifi Repeater
  • Increasing RAM

Improving your configuration. There are multiple ways to do this. There are simple tweaks and advanced tweaks that will award you with a greater usage of your bandwidth. Here a a few ways you can improve your internet speed. These range from simple to difficult.

5 Browser Tweaks/Time to Complete

6 Computer Configuration Tweaks

  • Limit Background Programs
  • Free Up More RAM –
  • Port Blocking
  • Low Load Antispyware
  • QoS settings
  • Change Your Router Settings

To See Step by Step Instructions on the above Tweaks

2 Advanced Tweaks:

  • Change TCP Auto Scaling
  • Increase Max Connections with Registry Change

Watch the Video on How to Change TCP Auto-Scalling

Getting a faster connection will always give you a tremendous boost. There is really no replacement for this option. Your ISP controls how much bandwidth you are able to use. The lower the bandwidth, the slower it’s going to take your PC to download high quality images, video and other elements. To see more video on on how to increase internet speed

Very Slow Computer Shutdown

Posted by | Uncategorized | No Comments
Speed Up Very Slow Computer Shutdown

Are you tired of waiting for the computer to turn off? Very slow computer shutdown is not an uncommon problem. But, it can be easily rectified with just a few easy steps. There are literally dozens of programs and processes that need to close before Windows can finalize it major shutdown operations.

However, rest assured your shutdown is not nearly as complex as a startup. One of the major reasons that your PC has a very slow computer shutdown is due to lack of maintenance. If you are in a hurry you can easily speed up a very slow computer shutdown by using a registry cleaner. Click here for a FREE scan.

Tips to speed up very slow computer shutdown

Tip #1: Cut down of the programs and processes running in the background.–When you start your computer many unnecessary processes are loaded. You can eliminate this by managing your msconfig.

Here is how:

  • Open your Start menu.
  • Click Run
  • In the command screen type “msconfig.exe”
  • In the system configuration utility,click either service or startup tab.
  • Uncheck all programs that your are no longer want to run in the background.
  • Click OK

For a list of programs that you don’t need and tips on speed up your startup, click this link

Tip #2: Clean your Registry– Usually slow computer shutdown often occurs due to a corrupted registry. You should perform a Scan Of Your Registry. If you receive more than 30 errors, this is the reason why you have slowdown.

Tip #3: Defrag your Computer–The faster your computer can find files the quicker it can shutdown. A very slow computer shutdown can be the result of your hard drive trying to search for disorganized and fragmented files that it needs for shutdown . Organize your hard drive by performing a defragmentation.
Here is how:

  • Open the Start Menu
  • Click on My Computer
  • Right Click your C: drive or your hard drive image.
  • Scroll down to the Properties and Click
  • In the Properties Menus, Open the Tools menu.
  • Choose Defragment Now.
  • In the Disk Deframenter menu. Click on Defragment
    For visual help and more on defragment click this link

Tip #4: Alter your Paging File Settings— The paging file (Pagefile.sys) is a hidden file on your computer’s hard disk that Windows XP uses as if it were random access memory (RAM). Therefore this file can be huge. On shutdown it must be cleared. This can cause very slow computer shutdown. We can avoid this by instructing our computer to not close this file during shutdown.Warning this a a dangerous tip because you to edit your manually registry. This can cause serious damage. A registry cleaner may be able to perform this function for you
Here is how:

  • Click Start
  • Click Run
  • Type regedit.exe
  • Find the folder: HKEY_LOCAL_MACHINE>System>CurrentControlSet>Control>Session> ManagerMemory
  • At this point you will see a list of files, Double click on Clear Page File At Shutdown
  • Change the value of the paging file to “0”

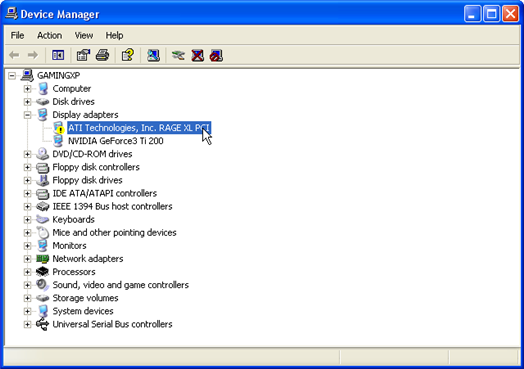
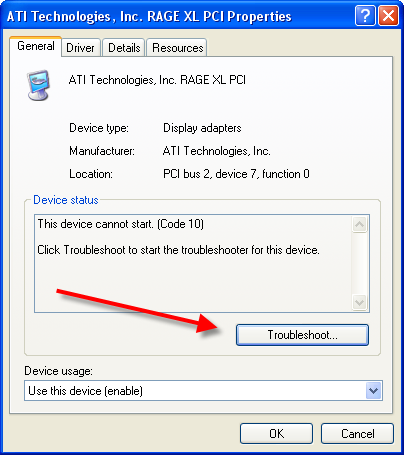
Tip #5: Check Your Device Drivers–When your computer shutdown, the operating system must disengage from all your hardware devices. This action allows the devices to power off. If the device has error or cannot be find the device, Windows will have a very slow shutdown or even hang forever. Updating the driver or troubleshooting it may eliminate this problem.Check your device drivers for any errors which are indicated by an yellow exclamation mark or an X. Following the below instructions to evaluate the driver::

  • Click “Start”
  • Click “Control Panel”
  • Click “System”
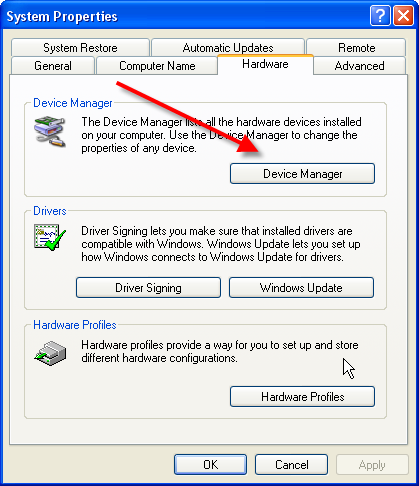
  • In the System menu, click the “hardware” tab
  • Click Device Manager to bring up a full list of installed hardware drivers.
  • Right click and choose “Properties” to evaluate the status and troubleshoot the hardware device.

Delete Computer History

At this point, you can either delete the driver or update it. If you choose to delete the driver, when you restart your computer, Windows will search for a driver to replace it. It may replace it with a more suitable driver or request that you download a new one.

Most Popular Articles

BEST REGISTRY CLEANERS
Slow Boot Up

Why is Internet Slow

Posted by | Uncategorized | No Comments
Why is Internet Slow Sometimes?

Why is internet slow? There are several reason why you experiencing slow connection speeds. A slow internet connection can be extremely exasperating. When most of the daily activities connected to the internet and online activities. High speed makes these task easy. There is simple culprits that cause slow internet. You may need to seek technical help to get rid of a ISP or hardware problem however that may cost you even more than you actually pay for monthly internet connection. You can try some of the simple and safe ways to determine the causes of slow internet and to fix those issues in order to speed up your online experience. The following are the steps that can help you find out why is internet slow on your computer.

Reason 1: Modem jamming:

Due to heavy and elongated usage, sometimes, the modem gets jammed and stops functioning properly. This issue can very easily be solved by simply resetting the modem. For this, terminate the internet connection, switch off the modem program and remove or unplug the modem and rest it for 10 to 15 minutes. Re-plug the modem and continue to setup the connection. It should now work at a faster speed.

Reason 2: Unnecessary Loads on the System:

During the course of time, you tend to stack up unnecessary files and cookies to slow down the overall performance of the system. Try removing the temporary file, cookies and history to enhance the internet speed. Timely cleaning of hard disk may also help.

Reason 3: Computer Settings:

Overtime, in order to set certain issues or requirement, you tend to change some computer settings to consequently cause slow internet speed. You can restore default settings by performing the procedure of system restore on your computer. Ways to Optimize Your Connection

Reason 4 : Browser Choice

Some users have experienced that changing their browser has helped them to increase internet speed. You can also try a different online browser. To learn more speed up slow browser problems, click here.

Reason 5: Peak Hours

There obviously are some hours of the day that observe huge internet traffic. To easily detect such heavy traffic that leads to slow internet to your system, try browsing at a non peak hour like late night or early morning. If in these timings, your internet speed is satisfactory, you can be sure that your system is all good to support high internet speed. You can also try some of the internet speed testing sites to make sure your upload and download speed is as per the subscribed package. If you are using youtube.com or Facebook at from 5 to 7. Peak time might be why is internet slow.

Reason 6: Virus Invasion:

A virus is the most common reason after low system/modem configuration to cause slow internet. It is always recommended to have quality antivirus software installed on your computer in order to have it perform at an optimum level. Find out why is internet slow by using a antivirus program to identify spyware.

Reason 7: Low Profile DNS

If your internet service provider company has a low profile domain name server, it can drastically affect the speed of internet. There are many alternative domain name servers that are available to have an enhanced internet speed. To see a step by step guide to changing DNS, click here

Reason 8: Slow Internet Connection:

Probably the internet connection you have is slower. You can consider investing in a faster internet service provider. You can contact your local internet service provider to suggest you faster internet connection with high data transfer rate and tier.

Related Tutorials:

16 Things you Should Do to Make your Internet Faster

Block SVCHOST EXE

Posted by | Uncategorized | No Comments
Want to block SVCHOST.EXE?

What is svchost.exe and why block svchost.exe?

Before you learn how to restrict svchost.exe from loading, first understand its importance. Svchost.exe is not a virus. It is a necessary application that helps your computer function properly.

According to Microsoft Svchost.exe acts as a host for a group of services on your computer. As you are aware, there a many services and programs that run silently in the background. Svchost.exe pools many of these services in one group and runs all of them at the same time. This is great for efficiency. However, it can cause your CPU to spike to 100%. Special Note: You can remove Svchost.exe errors with a good registry cleaner, click here to learn more.

Block SVCHOST.EXE by Removing Services

As mentioned before svchost.exe is essential. So, the trick is not to block svchost.exe, it’s to limit your computers need to use it. You can limit your computer need for svchost.exe. By cutting down on the services that are loaded when you PC starts. This can be done quite easily.

  • Open your Start menu.
  • Click Run
  • In the command screen type: msconfig
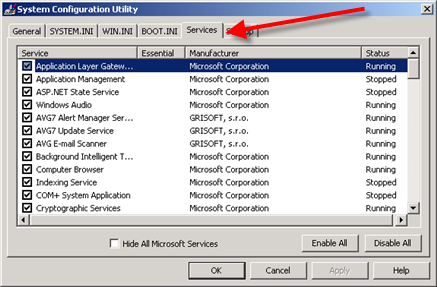
  • In the “system configuration utility”, Click “services” tab
  • Uncheck all services that are unnecessary.
  • Click “OK”
  • Click the link and check the next page for a list of services that are not needed for normal start-up. For a list of start-up services you can disable.
    Delete Computer History
    Delete Computer History

    Another way to discover the meaning behind all those services and stop svchost.exe from needed to load is to use the run command: services.msc. Enter this command the same way you did for msconfig. This will bring up the services window. If you drag the mouse to one of the services, it will give you a detailed explanation of the service in question. By right clicking the individual service you can stop the service immediately. More on stopping services
    Delete Computer History

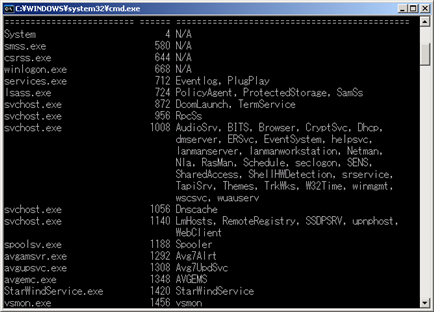
    To view the list of services that are running in Svchost:

    • Click Start
    • Click Run
    • Type CMD, and then press ENTER.
    • Type Tasklist /SVC, and then press ENTER.

    Tasklist displays a list of active processes. The /SVC switch shows the list of active services in each process. For more information about a process, type the following command, and then press ENTER
    Delete Computer History

    Remember that if there are errors in your svchost.exe. You may want to try using a Registry Cleaner may help you stop svchot.exe from loading.

    help with essay