Uncategorized Archives - Page 2 of 15 - Delete Computer History

Computer Crashed

Posted by | Uncategorized | No Comments
My Computer Crashed! Now What?

Most of us have been left dumbfounded after our computer crashed. We immediately are filled with anger when all our hard work has been suddenly destroyed by a fatal error. In fact, there are many other reasons why your computer is crashing. However, more often than not, the reasons why Windows has crashed are linked to poor maintenance.

Use a Registry Cleaner to eliminate errors and corrupt files, Click Here to learn more.

SOLUTION 1: RUN SYSTEM REPORTS

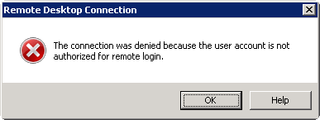
All Win7, Vista and XP have excellent tools to help you discover why the computer crashed. You should use these tools to give you vital data. Windows eventviewer and Problem Reports are two such tools.

The event viewer is a detailed tree that will allow you to view all files or applications that were accesed within a specified period. The two sections that you should pay special attention are Critical and Error

  • Click Start
  • Click Control Panel
  • Click System and Maintenance(System and Security in Win 7)
  • Click Administrative Tools
  • Double-Click Event Viewer.
  • Under Windows logs, Click System tab
  • Check for red errors icons and the exclamation icons.


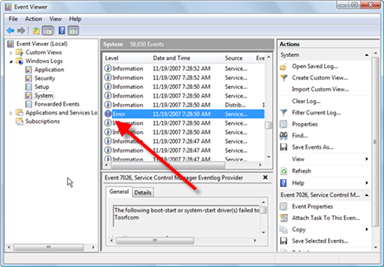
In this image, a driver has caused a major error and required the computer to shutdown.

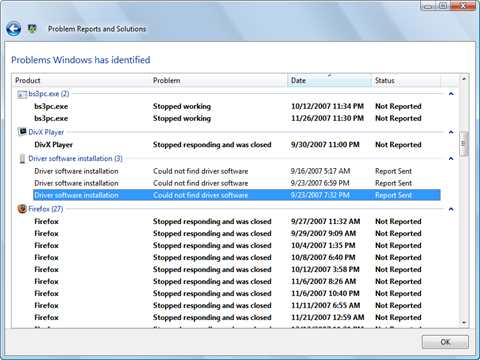
Win7/Vista’s Problem Tracker

  • Go to System and Maintenance(System and Security in Win 7)(Above Steps 1-3)
  • Click Problem and Reports.
  • You can view the problem history or check for potential solutions.


SOLUTION 2: Blow out the DUST!

Many people have discovered that their computer crashed due to dust. Dust acts an an insulator locking in heat. Increased heat causes your hardware to malfunction. RAM is particularly sensitive to heat. It will not function well at high temperatures. You should periodically clean your computer fan and remove excess dust with compressed air.

SOLUTION 3: REPAIR YOUR DRIVERS

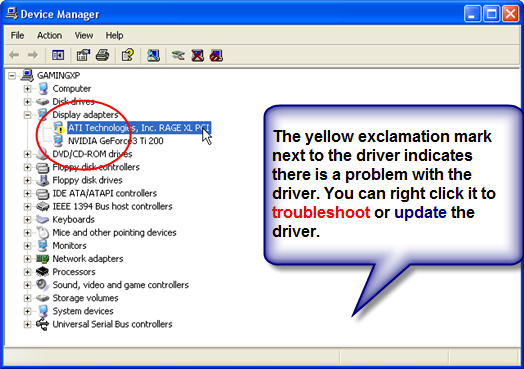
Updating the driver or troubleshooting it may eliminate this problem. Check your device drivers for any errors which are indicated by an yellow exclamation mark or an X. Follow the below instructions to evaluate the driver:

  • Click Start
  • Click Control Panel
  • Click System
  • In the System menu, click the hardware tab
  • Click Device Manager to bring up a full list of hardware drivers.
  • Right click and choose Properties to evaluate the status and troubleshoot the hardware device.

In Vista you can reach the the device manager the following method:

  • Click Start
  • Click Control Panel
  • Click Hardware and Sound
  • Click Device Manager

In Windows 7

  • Click Start
  • Click Control Panel
  • Click System and Security
  • Click System
  • Click Device Manager


28% of all driver errors come from third party graphics cards. Nvidia is the leader in card makers. So, it goes to say that they also are should share the blame for a lot of driver malfunctions. Luckily, their drivers are constantly updated. Faulty drivers often are why your computer crashed

SOLUTION 4: POWER SUPPLY

The power supply is the life blood of your system. If your system power supply is dying, it will create a host of problems in your system. Memory and hard drive failure are among the first to go. Eventually, your system will fail to boot because of lack of power. If you are a gamer and have added resources rely heavily on RAM and Graphics cards, you should update your system to meet the power demands by buying a bigger power supply.

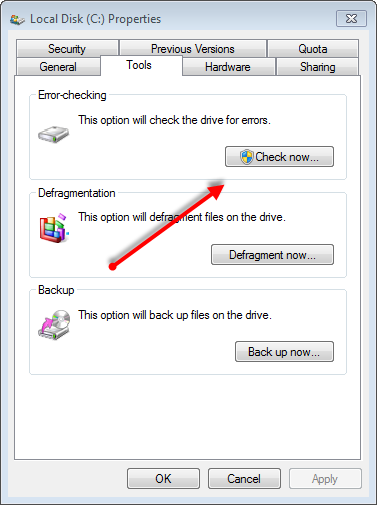
SOLUTION 5: REPAIR YOUR FILE SYSTEMS

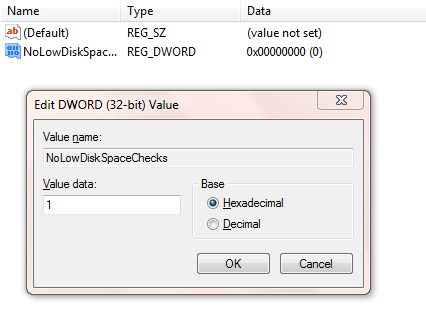
Check all files systems for corruption. There are many different filing system in your computer. Most files are often shared with a multitude of application. Online programs share direct linking library files. One of the biggest filing systems in your computer is the registry. Often times this filing system can lead to computer crashes. You should use a registry cleaner to repair this filing system.

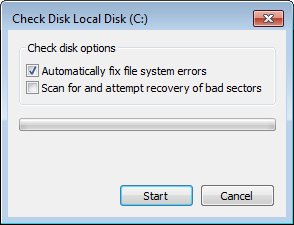
Other filing systems in your Windows Operating system, such as DLL, runtime and others can be repaired with SFC SCAN application tool. You can repair these files if you are in possession of your original Windows CD. Both XP and Vista offer a wonderful scan and repair tool that can usually repair your disrupted system and stops computer crashes.

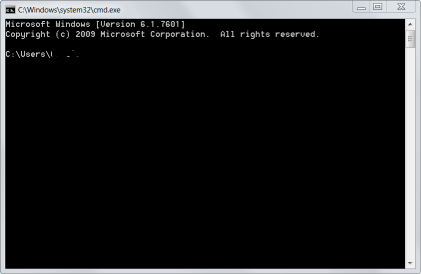
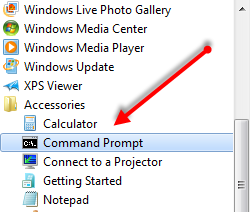
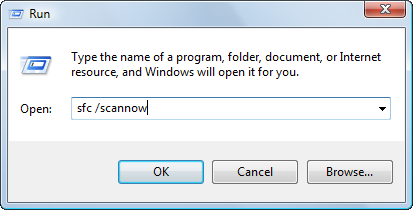
How to use Window’s SFC Scan and Repair command:

  • Click Start
  • Right Click the Command Prompt or type cmd
  • Type sfc/scannow
  • The tool will scan for damaged files. When prompted provide the Windows original disk for repair.


Other Helpful Tutorials

Get Files Back After a Crash
Slow Hard Drive
How to Speed Up your PC

how to write a essay

Removal

Posted by | Uncategorized | No Comments
Removal Request

If you are the owner of a site featured on the SCAM SITE forum and wish to have the site removed or wish to report unfair, illegal or any activity against general rules of decency in the comments section, Please contact us.

We can remove comments, the URL, or the topic from this forum by request. Please allow 48 hours for the removal of your site from this list.

Please note that all fields followed by an asterisk must be filled in.
[contact-form-7 id=”2883″ title=”removal_request”]

Internet History Keylogger

Posted by | Uncategorized | No Comments
Record All Online Activity with A Internet History Keylogger

A internet history keylogger or keylogger records keystrokes made on a computer. It captures every key pressed on the keyboard and stores in a file, memory bank, or external device that can be viewed by the person performing the monitoring in real-time.There are many reason why you may need an internet history keylogger. The obvious reason is to investigate someone online activity and discover what ever information you may find valuable.

Although these products were once known as hacker tool, they are now used commonly on home and office computers. Companies use this software to monitor there employees activity to ensure company rules are followed and secrets are not being shared.

Visit Download.com to see more Keyloggers. Click Here

Why you may need a keylogger?

Family members often use an internet history keylogger to monitor the children’s internet surfing habits. Other people install them on their home PC to find out if there spouse in behaving inappropriately online. Whatever the reason is an internet history keylogger can be a great software tool for discovering someone online activity and information quickly and easily.

However before you choose one these products here are the criteria you should use when selecting your PC spy.

Features you should look for:

  • Log all keystrokes such as username/password of various programs and websites, composed emails/documents, and online chat conversations.
  • Capture entire screen snapshots automatically in the background just like a secret camera.
  • Record all programs executed on the computer, including the user name, program title and time of use.
  • Save Websites people visited recently, including URL, site name, page title and time.
  • Easy to use, No PC slow down, and Invisible to other users!!

Whats the best keylogger?

There are tons of these products online. However, there are very few that are undetectable by other users. Usually these products are discovered by other users because of software conflicts or the software can be viewed in the startup programs.

The best keyloggers are completely invisible and don’t slow down your PC. Some of the best products on the market is are on free. Visit Cnet to Get a look at leading Internet History Keyloggers It is easy to use and offers a load of features that make it stand out from the pack. It configures seamlessly into your system and runs silently in the back ground. There is a lot of user support being this product which is always a good sign.

Chrome Crash

Posted by | Uncategorized | No Comments
Why Does Chrome Crash Constantly?

Delete Computer History
Has Google Chrome been crashing constantly? If so, there is usually a few reasons for this. Yes Chrome is very fast and relatively easy on your computer’s resources. But without a doubt, it has a few bugs that prevent it from being a stellar application. Adding some extensions to chrome will cause the browser to crash. One of the most common extension that cause crashing is Shockwave. So we will focus on this plugin but you can use the instructions below to remove any plugin that may be causing your browser to crash. You can fix errors that may conflict with your browser speed and stability, click here to learn more

One of the reason why Shockwave crashes Chrome is because this application is installed directly into Chrome as opposed. So if it crashes Chrome crashes. This is different from other browsers because Shockwave isn’t hardwired into the their architecture.To remove it. Follow the instructions below.

Disable Plugins

  • Open Google Chrome
  • Type chrome://plugins/
  • Scroll down to Shockwave
  • Click Disable

Delete Computer History

Shockwave VS. Chrome Shockwave Plugin

Shockwave plugin is one of the most poorly integrated features in Chrome. Shockwave is installed on your computer and Chrome also has a version on Shockwave installed in the browser. This is a serious recipe for Chrome constant chrahes. Remove it from the Plugins
Delete Computer History

Disable Extensions

If Shockwave isn’t your culprit, just select the plugin that you believe is causingthe problem.

Next if you are having problem with an extension. You can disable or uninstall it. Allow extension work seamlessly into Chrome. However, others cause a huge amount of slow down and may even crash the system. Follow the instruction below to get rid of any extensions that may be causing problems.

  • Open Chrome
  • Type chrome://extensions/
  • Disable the extension by removing the check in the enable box or you can choose to uninstall

Once you have performed these actions, you need to restart Google Chrome. If the problem persist. you should remove each extension one by one to find out which one is the culprit. Sometimes, its best to just uninstall the Google Chrome completely and do a fresh install to remove all the crap you’ve added to it. Lastly, your problem might be malware related.

FACEBOOK VS. CHROME

If you you are using Facebook, remember that Facebook remove Google Chrome from it’s recommended browser list. So, a lot of applications on Facebook might cause Chrome to crash. Facebook recommends using Internet Explorer and Opera for their site. So, its up to you regarding what browser you want to use.

Learn how to speed up Google Chrome with this Tutorial

Reset Browser to Default to Stop Chrome Crashes

In order to reset the browser to default, you will need to remove all the current user settings. This will force the browser back into the default settings. Therefore all customization will be removed. Do pefrom this follow the steps below

Click the Stacks icon> Choose Settings> Under the User section, highlight all the users and click Delete.

Delete Computer History
This is a very easy way to stop Google Chrome crash problems and constant crashing. Just be aware that you will lose all your options.

SCAN FOR ERRORS

If nothing has worked, you should scan the PC for errors. You can easily do this by using the SFC.EXE SCANNOW funciton in Windows. To do this, simply go to command prompt enter the command.

  • Click Start
  • Choose All Programs
  • Chose Accessories
  • Click the Command Prompt
  • Type SFC.EXE /SCANNOW

Delete Computer History

Faster Internet

Posted by | Uncategorized | No Comments
Make Faster Internet Connections with the Command Prompt

If you want a faster internet connection without changing your ISP plan, you should try optimizing your existing connection. There are ways to improve your internet connection with the command prompt. These are quick powerful tweaks that will allow you to get better usage out your existing connection. This is not going to change your speed dramatically but it will improve your existing connection significantly.

There first tweak will work on any version of windows. This will involving you altering one of your internet TCP options. TCP stands for transmission control protocol. This essential controls how much data is be downloaded and uploaded on your connection. Windows sets a window which is scaled to fit your connection. The bigger the window the more data can flow through. Windows usually makes the window smaller and larger to improve performance.

However, the problem is that routers and modem do necessarily support the TCP scaling option which causes conflict and can actually degrade your internet performance. So, it may be better to go into your connections and remove this option. Follow the instructions below to complete this option.

  • Click Start
  • Choose All Programs from the menu
  • Go to Accessories
  • Select the command prompt. Its best to run the command prompt as the administrator, you can do this by right clicking the command prompt and choosing this option.
  • Once you are in the command prompt you will need to write this line. You can simply copy and paste it also.
  • For Windows 7 Users, type or copy paste these commands. First to gain control of your settings and then disable the function

1st Disable Settings, Type:

netsh int tcp set heuristics disabled

2nd Use the Disable command

To disable TCP Auto- Tuning, Type:

netsh interface tcp set global autotuning=disabled

Re-enable TCP Auto-Tuning
1. Open Command Line as the Administrator and Type:

netsh interface tcp set global autotuning=normal

Here is the sequence in images and video
Delete Computer History

You can find the command prompt in the Accesories folder

Delete Computer History

Run the command prompt as the Admistrator to ensure that the settings stick

Delete Computer History

Entering the netsh interface tcp set global autotuning=disabled give you faster internet speeds by disabling the TCP Autotuing Window.

You can watch the Video to see how this works also.


For more ways to optimize your connection to get faster internet speeds, click here.

Other Tutorials:

Speed Up Uploads
Get Faster Downloads

0x80070057 Error

Posted by | Uncategorized | No Comments
Fix a 0x80070057 Error

0x80070057 error is a common error that occurs when an installation of new hardware or software has screwed up your previous system settings. Another culprit of this error is an external faulty device such as a printer. The addition of this new hardware could easily produce an 0x80070057 error. The message that you may have seen is the parameter is incorrect 0x80070057

Step 1: Remove all External Hardware.

When you add new external devices, Windows adds a link between the hardware and your system configuration. This is called a driver. When this driver is installed, it alters system configuration. Sometimes, this process can screw up your configuration. The best thing to do is unplug all the external devices and reboot your system. Then add the devices one by one to see which is causing the problem.

Step 2: Perform a System File Check

Windows has great tools to eliminate errors. You can perform a system file check using SFC Scannow command. Here is how:

  • Click Start
  • Choose All Programs, Click Accesories
  • Right Click the Command Prompt, Select Run as Administrator.
  • Type: sfc/scannow
  • Click Enter

Delete Computer History
You can use a Registry Cleaner to fix errors and speed up your PC

Step 3:Edit the Registry.

You may need to edit your registry. The registry holds all the information that Regedit allows you to go into your system files and modify or eliminate errors in it. To run Regedit, follow the instructions below:

  • Click Start
  • Choose the RUN command
  • Type Regedit
  • Navigate the registry to find:HKEY_LOCAL_MACHINE\SOFTWARE\Policies\Micfosoft\System
  • Click Edit
  • Select New/DWORD Value
  • Type: CopyFileBufferedSynchronouslo
  • Press Enter
  • Right DWORD, Modify the value by by right clicking it
  • Type 1 into the value box.

Delete Computer History
If you have this error in Outlook Express, Check out the Microsoft 0x80070057 Outlook Fix

Popular Articles

Best Registry Cleaner
Learn How Speed Up Your Internet Connection
Slow Streaming Video

Computer Error Messages

Posted by | Uncategorized | No Comments
Whats this Computer Error Message?

Top 5 Computer Error Messages

If you have been working on Windows over some years, you must have seen several error messages. Windows is surely an excellent platform, but it’s infamous for its pesky error messages. Here are five of the most common Windows error messages (along with their solutions).

1. Invalid Win32 Application

This computer error message mostly shows up when you try to open a file or a program: “ is not a valid Win 32 application”. There are many reasons for this error, and the major one is that the file is intended to run on a different Windows version, or some bits of the file might be corrupt. So if you are trying to open a 64-bit application on a 32-bit system, you’ll encounter this error.

Solution: This error mostly occurs with downloaded files. Confirm the compatibility of the file. Delete it and try to re-download it. If the error shows because you tried to open a program, make sure that the program client is installed properly on your computer. Also, make sure that the program doesn’t share its name with the directory that contains it. If this doesn’t work, install the latest drivers so that there are no hardware incompatibilities.
Delete Computer History

2. Connection denied

When you try to log into a remote desktop, you might get a computer error message that says, “Connection was denied as the new user account isn’t authorized for a remote login”

Solution: To setup Windows Server in order to log into a remote system, you have to add your computer to user groups for the same dialogue as on Windows workstation. To do this, visit your control panel and click on System > Remote Settings. It will open the System Properties dialog box with the Remote tab highlighted. Click on the button that says ‘Select users’. Now add users or groups that you want to connect to. If things are still not working, you can check your licensing for Terminal Server and see if it is configured properly.
Delete Computer History

3. File is open in Windows Explorer

This error will not allow you to delete, rename, or move a file. This computer error message typically happens when the file you are trying to delete is already open.

Solution: If you are trying to rename, delete, or move a file that is already open, you’ll get an error message. To complete your action, close the file and then try again. If this doesn’t help, restart your computer in safe mode. This will close all the extra programs, which means the file memory will be freed up and it can be deleted now.
Delete Computer History

4. Stop error 0x7B

Stop Error 7B generally means that there is some problem with your hard drive. You might see an error message that says Windows has been shut down to avoid problems with your computer. This happens when Windows configuration doesn’t have some essential component (like an IDE controller).

Solution: Make sure your configuration has all necessary components: IDE controller, disk drive component, and primary & secondary IDE Channel components. If this doesn’t resolve the error, boot using a diagnostic CD. If it still doesn’t work, reset the BIOS settings and reboot the system. Change the booting options and set the ‘Boot from CD’ option as the first one.
Delete Computer History
If you have a 0x80070057 computer error message, Click here to find out how to fix it.

5. No logon servers

If you are trying to connect a system to another, you might get an error that says there are no logon servers.

Solution: This error can mostly be resolved by simply rebooting the system or reconnecting the cables. You can also try to turn off Simple File Sharing. To do this, go to Tools in Control Panel and select Folder Options. Now uncheck the option that says ‘Use simple file sharing’.In case it doesn’t work, check the DNS configuration or rejoin the domain.
Delete Computer History

Popular Articles

Best Registry Cleaner
Fix a Slow Internet Connection
PC Speed Killers

Fix Computer Freezes

Posted by | Uncategorized | No Comments
How to Fix Computer Freezes

You can easily fix computer freezes, lockups and blue screen by performing just a few maintenance tips or taking it to PC repair shop. However, the PC tech will perform the same set of test in order to repair your PC. So, Its better to save yourself a few hundred dollars and do it yourself. Speed up your computer and fix errors with a registry cleaner. Click here to learn more.

Reasons for Freezes, Lockups, Blue Screens?

85% of time you can fix computer freezes by tuning up your PC. By tuning up your PC you can free up a large amount of wasted resources, speed and power that your CPU is using to keep unnecessary programs, data and services alive.Click Here to 5 minute Tips to Tune Up your PC

The other 15% of the time, your PC could be suffering from some serious problems.

Factors that cause PC freezes

  • Corrupted Registry–If you don’t clean your registry periodically your computer is bound to lockup, freeze or go to blue screen. A corrupted registry will eat cause a wide array of system errors and kill your PC processing power. Scan and repair regularly to fix computer freezes. Registry Cleaner is a useful maintenance tool; it will keep your PC running in top shape. This will also repair a host of errors.
  • Spyware and Adware–This can cause your computer to slow to a crawl. Spyware generate an a massive amount of processes that will choke the life out of your PC. If you suspect you have spyware, try to fix computer freezes by scanning your drive for these malware For spyware removal tips click here
  • Bad Device Drivers — Your computer’s operating system can’t recognize a hardware device automatically, it needs a set of instructions telling it how to do so. These instructions are known as device drivers. If a device in or attached to your computer isn’t working properly, one of the first things you should do is see if its driver has been corrupted.
  • Low Disk Space — If your computer doesn’t have a sufficient amount of free space you are bound to have problems. The CPU and RAM both need a fair amount of empty space to keep your PC running smooth. Emptying your temp files, A.K.A cache files, is a necessary maintenance task to keep your resources free. If you cache is full the RAM has no place to temporarily load data. This may cause as lockup or even a crash. You can avoid this by clearing the catch and increasing your virtual memory paging volume. Click here to see how to increase virtual memory.

PART 2: FIX A FROZEN COMPUTER

RELATED ARTICLES:

SLOW HARD DRIVE FIXES
SPEED UP SLOW INTERNET VIDEOS

Low Disk Space

Posted by | Uncategorized | No Comments
Stop Low Disk Space Error Message

Delete Computer History
Here is a common Low Disk Space Problem. You are saving a document, but annoying “Low disk space” message error keeps popping up. And it’s not just document saving that causes these messages. They can show up anytime and can be very frustrating, especially while you are doing an important task.

If you are able to save your work once and try to carry on, these messages would keep coming up and make you believe that there is something fishy happening in your computer that is causing these problems. And it might even be true. Do you want to know what is eating up the space on your hard disk? And do you want to know how to resolve these pesky errors? Let’s have a look at some solutions. Most of these methods are for Windows 7, but they would work on earlier versions as well.

Use a Registry Cleaner to Stop Low Disk Space Errors with one click!

Solution #1 Close Extra Programs

If there are open windows or programs running in the background, close them. There will be enough space to save your file and to continue with the work. This method works most of the time, but in case it doesn’t, save to an external drive (a USB drive for example). That would be fine for now, but it’s best to free up some space on hard disk for further use. So follow other solutions as well.

Solution #2 Turn off Antivirus

Turn off the antivirus, and it might increase space on your disk and stop low disk space messages. Antivirus programs take up a lot of disk space, and thus lower the computer performance- especially when they are updating. To know the space your program is taking, visit Control Panel. Go to Program Features and view the list of programs. Every program shows the disk space used by it. For Windows XP, go to Add/Remove Programs. If you have other programs no longer in use remove them also. It a great way to stop a low disk space message.

Make sure you turn it on again later. If your antivirus takes up a lot of space, buy a lightweight antivirus, like AVG. You can get the free version here: http://free.avg.com/us-en/free-antivirus-download Also check for the presence of spyware/adware. These two malwares can also make your computer buggy.

Solution #3 Empty Recycle Bin

Delete Computer History

Delete the files that you don’t use, and uninstall the programs you no longer run to stop low disk place messages. Also, delete the cache and cookies of your web browser. For Google Chrome, you can do it by selecting Options->Under the Hood.

Delete Computer History

For Mozilla Firefox, select Options, and click on Privacy tab. Click on the link that says Clear your recent history.

Delete Computer History

Solution #4 Use Check Disk

Check your disks to find errors in your hard drive. Go to My Computer and select the Hard Drive you want to check. Right click on it and select Properties. A popup will open up. Select Tools tab. Now click on Check Now.

Delete Computer History

If this doesn’t eliminate the low disk space message, try defragmenting your hard drive. It frees up hard disk by clubbing together free memory space. Right below the Check now option, you can see Defragment now. Or you can go to Start, and type Disk Defragmenter in the search box. You will see the option of Defragmenter. Select it.

Delete Computer History

Now you can click on disks and defragment them. With this, all free memory would be grouped together, giving you more space.

Solution #5 Correct Registry Errors

Here are the steps for registry cleaning:

  • Open Regedit
  • Go to HKEY_CURRENT_USER\ Software\ Microsoft\ Windows\ CurrentVersion\ Policies\ Explorer
  • If you can’t find it, create a new DWORD value. Name it NoLowDiskSpaceChecks
  • Now double click on the new DWORD Value. Enter the value 1. Press ok.
  • Now check the error messages. They should be gone.

Delete Computer History

Solution #6 Delete Windows Update Uninstall Files

This step is for Windows XP users. You can delete folders whose names begin with $NtUinstall. These folders would be in your Windows directory
Delete Computer History

They refer to previous hot fixes. If you have applied the fixes and your system is stable now, you wouldn’t want to uninstall them. So there is no need to keep the uninstall files. You can safely delete them. Essentially unistalling files is the best way to stop low disk space message problmes

Solution #7 Bigger Hard Drive

If nothing else works, it is best to have a bigger hard disk. If you don’t want to get tangled into internal cabling, you can also get external hard disks. They will give you plenty of extra space. If you are planning to use an internal hard drive, make sure its size is same as the existing hard drive so that it can fit your computer casing. There are many inexpensive hard drives available in the market. This is a easy but last measure to stop a low disk space message.

If you start facing disk space errors, try a few of these solutions.

A handy tip in the end If you have decided to replace the internal hard disk of your computer, be very careful while you do it. If you don’t keep things grounded, it could lead to buildup of static electricity that can ruin the new drive. Before you open the casing, read the instructions given on the drive.

Try using a PC Cleanup Product to Stop a Low Disk Space Message

Fix PC Errors

Posted by | Uncategorized | No Comments
How to Fix PC Errors with Windows Tools

Can you fix PC errors for free? Yes, your computer’s operating system has the ability to scan for both physical and software errors. Both of these scan are free and can be performed with your system tools. Windows naturally collects errors naturally through simple use. Deleting software, updating, sudden shutdowns are all ways that your computer can collect errors. Of course, faulty hardware will cause computer error messages. A registry cleaner can repair error messages and speed up your computer.

Use the Error Checking to Fix PC Errors

Your hard disk can recieve physical damage or other errors. The sectors on the drive may get corrupted making them difficult for Windows to read. This will cause some major slow down because it takes your operating system a lot longer to fix it. However, you can instruct Windows to skip over these error filled sections. To use check hard disk condition follow the sections below

  • Click Start
  • Choose Computer
  • Right Click the hard drive location. For example C:
  • Choose Tools.
  • Choose Error Checking
  • You have the options of Automatically fixing the errors and repair the bad hard drive sectors

Delete Computer History

There is an alternate method using the command prompt. You can access the command prompt, using the following method.

  • Click Start.
  • Choose All Programs
  • Click the Right Click the Command Prompt and Run as the Adminstrator
  • Type chkdsk c: (Or whatever drive you have)

Use SFC Scannow Command to Fix PC Errors

Errors can be caused by almost any change in software configuration. Luckily, a lot of these errors can be fixed automatically with system tools. You can use the scannow function to fix a lot of Windows system file errors. errors. To use the scannow command you will have to follow the sequence.

You can follow the steps above to enter into the command prompt. Once in the command prompt. You can use the sfc scannow command. Simply type the follow the instructions below.

  • Enter the command prompt.
  • Type sfc /scannow or sfc.exe /scannow

Delete Computer History
To check out to Fix PC Errors in your Registry.

Use Windows Disk to Fix PC Errors

Using the Windows disk will also allow you to repair system files. This is a great function that can solve problems. Follow the sequence

  • Enter the Windows CD in your Drive When prompted, press any key to boot from drive or DVD.
  • The system recover dialog box will appear with options.

A. Windows System Diagnostic Repair

This is a great option that will show the reasons you have physical and software problems.

B. Startup Repair

This is the less evasion repair but basically for fixing startup errors.

C. System Image Repair

System Image is similar to a system restore. It will fix errors by returning to previous system point.

To Read more about commmon computer error messages.

Watch The Video to Fix Computer Errors

Delete Computer History